2023 Toyota Tacoma Manual Transmission: A Comprehensive Overview
The 2023 Toyota Tacoma continues its legacy, offering a robust mid-size pickup experience, now enhanced with a reintroduced six-speed manual transmission option for enthusiasts.
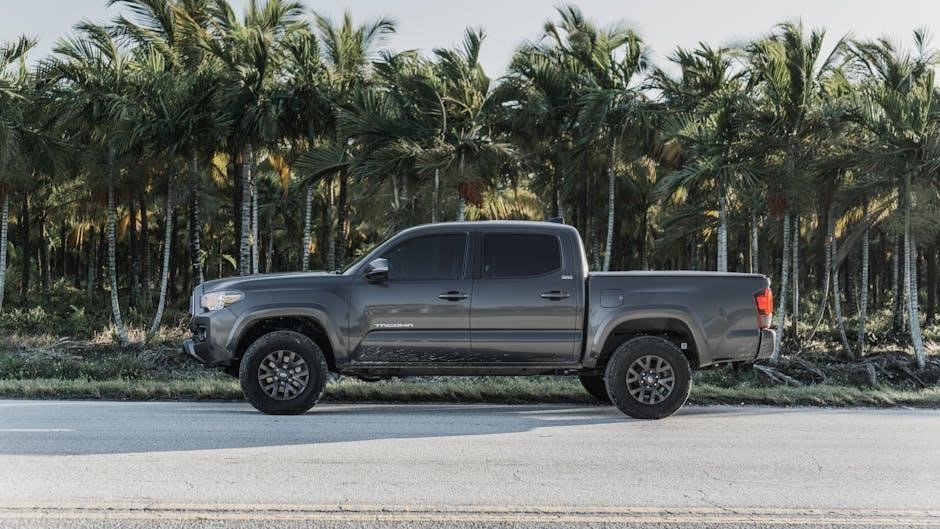
The 2023 Toyota Tacoma marks a significant moment for driving purists, as Toyota reintroduced a manual transmission option after a hiatus. This decision caters to a dedicated fanbase craving a more engaging driving experience within the popular mid-size truck segment. Specifically available on the TRD Off-Road and TRD Pro trims, the six-speed manual offers a direct connection between driver and machine, appealing to those who prioritize control and feel.
This isn’t merely a nostalgic addition; it’s a response to consistent customer demand. The Tacoma has long been favored by off-road enthusiasts and those seeking a durable, reliable vehicle, and the manual transmission enhances its appeal for those who enjoy mastering the terrain. The return of the manual is a testament to Toyota’s willingness to listen to its customer base and deliver a product that resonates with their passions.
The Return of the Manual: Why Toyota Brought it Back
Toyota’s decision to reintroduce the manual transmission in the 2023 Tacoma wasn’t driven by market trends, but by a dedicated and vocal customer base. For years, enthusiasts consistently requested a manual option, believing it would amplify the Tacoma’s already strong off-road capabilities and overall driving enjoyment. Toyota listened, recognizing the value of offering a choice that catered to a specific segment of their loyal customers.
Furthermore, the manual transmission aligns with the Tacoma’s rugged and adventurous spirit. It provides a more visceral connection to the vehicle, allowing drivers to feel more in control, particularly when navigating challenging terrain. This return wasn’t about chasing volume, but about reinforcing the Tacoma’s identity as a truck for those who truly appreciate the art of driving.

Technical Specifications of the 6-Speed Manual
The 2023 Tacoma’s manual transmission is paired exclusively with the 3.5L V6 engine, offering a robust 278 horsepower and a direct driver experience.
Engine Compatibility: 3.5L V6 DOHC VVT-iW
The 2023 Toyota Tacoma’s 3.5-liter V6 engine, designated DOHC VVT-iW, serves as the sole powertrain option compatible with the six-speed manual transmission. This naturally aspirated engine delivers a respectable 278 horsepower, providing ample power for both daily driving and off-road adventures. The VVT-iW (Variable Valve Timing with intelligence – Wide) technology optimizes engine performance across a broad RPM range, enhancing fuel efficiency and responsiveness.
Notably, Toyota deliberately avoided turbocharging or electrification for this engine configuration, prioritizing simplicity and a more engaging driving experience for manual transmission enthusiasts. This choice aligns with the Tacoma’s reputation for reliability and its appeal to drivers seeking a traditional truck feel. The engine’s robust construction and proven track record contribute to the overall durability expected from a Toyota pickup.
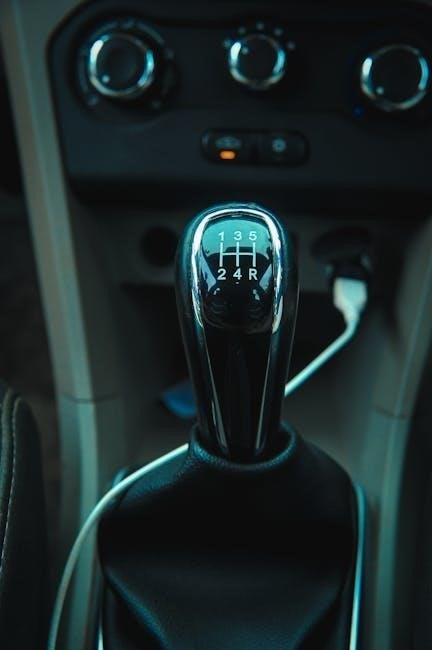
Transmission Details: 6-Speed Manual Configuration
The 2023 Toyota Tacoma’s reintroduced six-speed manual transmission is a direct-shift configuration designed to provide drivers with a connected and engaging driving experience. It features a traditional shift pattern, offering precise gear changes and enhanced control, particularly beneficial during off-road excursions. The transmission is specifically paired with the 4×2 and 4×4 drivetrain options, catering to a diverse range of driving preferences.
A clutch-start cancel switch is included, simplifying operation for those less familiar with manual transmissions. Toyota focused on delivering a robust and reliable manual gearbox, ensuring durability under demanding conditions. The transmission’s internal components are engineered to withstand the torque output of the 3.5L V6 engine, contributing to the Tacoma’s overall dependability.
Drivetrain Options: 4×2 and 4×4 Availability
The 2023 Toyota Tacoma manual transmission is offered with both rear-wheel drive (4×2) and four-wheel drive (4×4) configurations, broadening its appeal to a wider spectrum of drivers. The 4×2 models feature a self-locking rear differential as standard, enhancing traction in slippery conditions. For those seeking enhanced off-road capability, the 4×4 system provides a robust solution with a rigid connection to the front axle.
The 4×4 system allows for on-demand engagement, enabling drivers to switch between two-wheel drive for fuel efficiency and four-wheel drive when tackling challenging terrain. This system, coupled with features like Multi-Terrain Select and Crawl Control, maximizes the Tacoma’s potential in diverse environments, making it a versatile choice for both daily commutes and adventurous expeditions.

Driving Experience & Performance
The 2023 Tacoma’s manual transmission delivers a connected driving feel, offering precise control and engaging performance with its naturally aspirated 278-horsepower V6 engine.
Shifting Feel and Clutch Engagement
The 2023 Tacoma’s six-speed manual transmission is praised for its remarkably smooth and precise shifting experience. Drivers consistently report a satisfying mechanical feel, avoiding the often-noted notchy or vague engagement found in some other trucks. Clutch engagement is well-weighted, providing ample feedback without being overly heavy for extended driving.
This balance makes it accessible for both experienced manual drivers and those newer to the platform. The transmission’s gearing is thoughtfully chosen, offering strong acceleration in lower gears and comfortable cruising at highway speeds. The shift throws are relatively short, contributing to a more direct and sporty feel. Overall, the manual Tacoma provides a genuinely engaging and rewarding driving experience, enhancing the connection between driver and machine, a key element for off-road control and enjoyment.
On-Road Driving Characteristics
The 2023 Toyota Tacoma with the manual transmission delivers a surprisingly refined on-road experience. While retaining its truck-like robustness, the six-speed gearbox contributes to a more connected and engaging drive compared to the automatic variant. The 3.5L V6 engine provides ample power for merging and passing, and the manual allows drivers to maintain control over the engine’s RPMs for optimal performance.
Road noise is generally well-contained, and the suspension effectively absorbs bumps and imperfections. The clutch pedal is comfortable for daily commutes, and the shifting action remains precise even in stop-and-go traffic. Though not a sports car, the manual Tacoma offers a level of driver involvement that enhances the overall enjoyment of everyday driving, making it a practical and fun choice for both work and leisure.
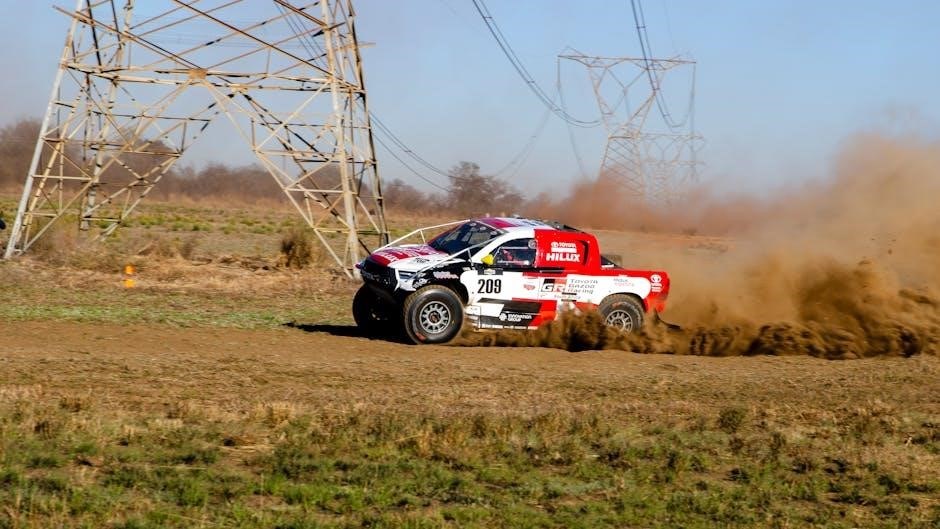
Off-Road Capabilities with Manual Transmission
The 2023 Toyota Tacoma’s manual transmission truly shines when tackling challenging off-road terrain. The six-speed gearbox provides exceptional control over engine braking and power delivery, crucial for navigating rocky trails and steep inclines. Drivers can precisely select the optimal gear for maintaining momentum and avoiding wheelspin, enhancing traction in loose surfaces.
Combined with the available 4×4 system and Multi-Terrain Select, the manual Tacoma becomes a formidable off-road machine. Crawl Control further assists by automatically managing throttle and brakes at low speeds, allowing the driver to focus on steering. The manual transmission’s direct connection fosters a greater sense of control and confidence, making it a favorite among off-road enthusiasts seeking a truly immersive driving experience.
Multi-Terrain Select and Crawl Control Integration
The 2023 Toyota Tacoma seamlessly integrates its manual transmission with Toyota’s advanced off-road technologies, Multi-Terrain Select (MTS) and Crawl Control. MTS allows drivers to tailor vehicle settings to various terrains – Mud, Sand, Rock, or Snow – adjusting engine output and traction control for optimal performance. This system works harmoniously with the manual gearbox, enabling precise gear selection to match the chosen terrain mode.
Crawl Control, when engaged, manages throttle and braking automatically at low speeds, allowing the driver to concentrate on steering over obstacles. The manual transmission doesn’t diminish Crawl Control’s effectiveness; instead, it provides a more connected feel as the system modulates power. This combination delivers exceptional control and confidence when navigating challenging off-road conditions, making the Tacoma a capable and adaptable vehicle.

Features & Trim Levels Offering Manual Transmission
The 2023 Tacoma offers the six-speed manual primarily on the TRD Off-Road and as an available option on the TRD Pro trim levels, enhancing capability.
TRD Off-Road Trim: Manual Transmission Standard
The 2023 Toyota Tacoma TRD Off-Road distinguishes itself by making the six-speed manual transmission a standard feature, catering directly to drivers who prioritize engagement and control. This trim level is specifically designed for off-road adventures, and the manual transmission complements its rugged capabilities. It’s paired with a 3.5L V6 DOHC VVT-iW engine, delivering 278 horsepower.
Beyond the manual gearbox, the TRD Off-Road boasts features like Multi-Terrain Select and Crawl Control, which work seamlessly with the manual transmission to optimize performance across various terrains. It also includes a locking rear differential, Bilstein shocks, and all-terrain tires, further enhancing its off-road prowess. The interior maintains a focus on durability and functionality, providing a comfortable yet capable environment for tackling challenging trails. This combination makes the TRD Off-Road a compelling choice for those seeking a truly connected driving experience.
TRD Pro Trim: Manual Transmission Availability
The 2023 Toyota Tacoma TRD Pro elevates the off-road experience, and notably, offers the six-speed manual transmission as an available option, though not standard like the TRD Off-Road. This allows enthusiasts to combine the Pro trim’s premium features with the engaging control of a manual gearbox. The TRD Pro builds upon the TRD Off-Road’s foundation, adding upgraded Fox internal bypass shocks, a front sway bar disconnect, and unique styling elements.
Equipped with the same robust 3.5L V6 engine, the manual TRD Pro delivers ample power for conquering challenging landscapes. It retains the benefits of Multi-Terrain Select and Crawl Control, ensuring optimal performance in diverse conditions. The interior features premium materials and technology, including an 8-inch touchscreen with SiriusXM satellite radio. Choosing the manual transmission in the TRD Pro provides a unique blend of luxury, capability, and driver involvement.
Interior Features and Technology
The 2023 Toyota Tacoma’s interior, regardless of transmission choice, focuses on durability and functionality. Models equipped with the manual transmission don’t sacrifice technology; many trims feature an 8-inch touchscreen infotainment system, complete with Apple CarPlay and Android Auto compatibility. Higher trims boast features like SiriusXM satellite radio with a three-month All Access trial and integrated Safety Connect services.
The cabin design prioritizes ease of use, with logically arranged controls and comfortable seating. While not overtly luxurious, the Tacoma’s interior is well-built and practical for both daily driving and off-road adventures. The manual shifter is positioned for comfortable reach, enhancing the driving experience. Available features include keyless entry, and climate control systems, contributing to a well-rounded and modern interior environment.

Mechanical Components & Systems
The Tacoma incorporates a transmission fluid temperature sensor for diagnostics, a 4WD actuator for front differential adjustment, and a dedicated cooling system for reliability.
Transmission Fluid Temperature Sensor Diagnostics
Diagnosing issues related to the transmission fluid temperature sensor in the 2023 Toyota Tacoma’s manual transmission system is crucial for maintaining optimal performance and preventing potential damage. This sensor provides vital data to the vehicle’s computer, influencing shift patterns and overall transmission operation. Diagnostic trouble codes (DTCs) can pinpoint specific problems, such as sensor malfunction, circuit faults, or wiring issues.
Inspection procedures involve verifying the sensor’s resistance values, checking for proper electrical connectivity, and examining the wiring harness for any signs of damage or corrosion. A faulty sensor can lead to inaccurate temperature readings, potentially causing erratic shifting or even transmission overheating. Utilizing a scan tool to monitor live data streams allows technicians to assess the sensor’s output in real-time, confirming its functionality and identifying any discrepancies. Proper diagnosis and repair ensure the longevity and smooth operation of the manual transmission.
4WD Actuator and Front Differential Adjustment
For 2023 Tacoma models equipped with a manual transmission and four-wheel drive, the 4WD actuator plays a critical role in engaging and disengaging the front differential. Proper functionality ensures seamless transitions between 2WD and 4WD modes, enhancing traction in various terrains. The actuator, often associated with Hilux Surf and other Toyota platforms, requires precise adjustment to guarantee reliable operation.
Adjustment procedures typically involve checking for proper engagement and disengagement, and ensuring the actuator moves freely without binding. A bolt-on style adjustment allows for fine-tuning of the front differential, optimizing its alignment for smooth operation. Regular inspection and maintenance of the 4WD system are essential, particularly for those frequently utilizing off-road capabilities. Correct actuator function and differential adjustment contribute significantly to the Tacoma’s renowned off-road prowess.
Cooling System for Transmission
The 2023 Toyota Tacoma’s manual transmission benefits from a dedicated cooling system, crucial for maintaining optimal operating temperatures during demanding conditions. This system mitigates the risk of overheating, particularly during extended off-road excursions or heavy towing. While specifics vary, the cooling system typically incorporates a transmission fluid cooler, often integrated with the radiator, to dissipate heat effectively.
Effective cooling is paramount for preserving transmission fluid integrity and preventing premature wear. Diagnostic procedures focus on monitoring transmission fluid temperature, identifying potential leaks, and verifying the cooler’s functionality. A properly functioning cooling system ensures consistent shifting performance and enhances the longevity of the manual transmission. The presence of this system demonstrates Toyota’s commitment to reliability, even with the reintroduction of a manual gearbox.

Comparisons & Considerations
Choosing between the manual and automatic Tacoma depends on driver preference; the manual offers engagement, while the automatic prioritizes convenience and ease of use.
Manual Tacoma vs. Automatic Tacoma
The core difference between the 2023 Tacoma with a manual transmission and its automatic counterpart lies in the driving experience. The six-speed manual provides a more direct connection to the vehicle, appealing to drivers who enjoy greater control and engagement, particularly during off-road adventures or spirited driving. It allows for precise gear selection and a more immersive feel.
Conversely, the automatic transmission prioritizes convenience and ease of use, especially in stop-and-go traffic or for drivers less familiar with manual transmissions. While the automatic may slightly impact fuel economy and offer a less visceral experience, it simplifies driving and reduces driver fatigue. The V6 engine’s simplicity, with 278 horsepower and no turbocharging, is a significant appeal for both transmission options.
Ultimately, the best choice depends on individual preferences and driving needs. The manual Tacoma caters to enthusiasts seeking a more involved driving experience, while the automatic Tacoma suits those prioritizing comfort and convenience.
Competitors with Manual Transmission Options
In the mid-size pickup truck segment, manual transmission options are becoming increasingly rare. The 2023 Toyota Tacoma stands out by offering a six-speed manual, a feature largely absent from competitors like the Chevrolet Colorado, GMC Canyon, or Nissan Frontier. While some rivals offer advanced automatic transmissions with numerous gears and features, they generally lack a traditional manual option.
The Ford Ranger, previously offering a manual, has discontinued it for recent model years, leaving the Tacoma as one of the few remaining choices for drivers who prefer a stick shift. This scarcity enhances the Tacoma’s appeal to a niche market of enthusiasts who value the control and engagement a manual transmission provides.
Consequently, the Tacoma’s manual transmission serves as a significant differentiator, attracting buyers specifically seeking this feature and solidifying its position as a unique offering within the competitive landscape.
Resale Value and Market Demand
The 2023 Toyota Tacoma, renowned for its exceptional reliability and strong resale value, is expected to maintain these qualities even with the manual transmission option. Historically, Tacomas hold their value remarkably well, often exceeding competitors in the mid-size truck segment. The introduction of a manual transmission caters to a dedicated enthusiast base, potentially increasing demand among collectors and those prioritizing driving experience.
Limited production numbers of the manual Tacoma, coupled with its unique appeal, could further drive up resale values in the future. The scarcity of manual trucks generally translates to higher prices on the used market.
Market analysis suggests a sustained demand for the Tacoma, bolstered by its reputation and the renewed interest in driver-focused vehicles. This combination of factors positions the manual Tacoma as a potentially sound investment.

Maintenance & Reliability
Routine maintenance, including clutch inspections and fluid checks, will be crucial for the 2023 Tacoma’s manual transmission to ensure long-term dependability and performance.
Clutch Replacement Intervals
Determining precise clutch replacement intervals for the 2023 Toyota Tacoma’s manual transmission is challenging without extensive long-term data, as it heavily depends on individual driving habits and conditions. However, considering the Tacoma’s robust build and the nature of manual transmissions, a proactive approach to maintenance is advisable.
Generally, for typical driving – a mix of city and highway – owners can anticipate a clutch lifespan ranging from 60,000 to 100,000 miles. Aggressive driving, frequent off-roading, or consistent towing will significantly reduce this interval, potentially requiring replacement as early as 30,000 to 50,000 miles.
Monitoring for signs of clutch wear, such as slippage during acceleration, difficulty shifting, or a high clutch pedal engagement point, is crucial. Regular inspections during scheduled maintenance appointments can help identify potential issues early on, preventing more extensive and costly repairs down the line; Prioritizing smooth shifting techniques and avoiding excessive clutch abuse will maximize the lifespan of this vital component.
Potential Issues and Troubleshooting
While the 2023 Tacoma’s manual transmission is designed for durability, some potential issues may arise. Common concerns include difficulty shifting, particularly into first or reverse gear, often linked to clutch hydraulic system issues or internal transmission synchronization problems. Clutch slippage, indicated by high engine RPMs without corresponding acceleration, signals wear and potential replacement needs.
Grinding noises during shifts suggest worn synchronizers or improper clutch engagement. Troubleshooting begins with checking clutch fluid levels and inspecting for leaks. If shifting remains problematic, a professional diagnosis is recommended to assess internal transmission components.
Ensure proper pedal adjustment and cable tension. Ignoring early warning signs can lead to more significant damage. Regular transmission fluid checks, though less frequent than automatic transmissions, are still beneficial. Addressing issues promptly prevents costly repairs and maintains optimal driving performance.